Friday, December 21, 2018

Craftsy Shop To Be Removed

On Thursday I woke up and the first thing I do is check my email. Being on a different timezone from most of my customers, sometimes I wake up to frantic messages from them, usually about downloading issues. I hate to keep people waiting for my response but there's nothing I can do about the timezone. Anyway, there were no frantic messages but there was one from Craftsy.


Just like that, with one email, Craftsy is kicking me off the marketplace. No explanations, no reasons given. I'm out.

At first I was mad as hell. Fuming mad. But it's wasted energy. It is what it is. I know some "top designers" got to stay on the marketplace including Craftsy instructors but with reduced inventory. (those who were kicked out may appeal) I don't know the criteria Craftsy used to keep the "top designers". It feels quite cruel, the way Craftsy has gone about it.

Those of you who have bought from my Craftsy shop, don't panic. After my shop has been removed on 28th December, your patterns will still remain in your pattern library until the day Craftsy goes up in flames so please go on with your life.

I've gone through all the patterns in the Craftsy shop and reduced all applique from $1.50 to $1. Yep, one buck. All bag patterns have been marked down to $4. Why $4? Well, four in Chinese sounds like "die/death". It's considered an unlucky number. But I'm not superstitious. Well, sometimes... Four also sounds like "yes" in Chinese. So yes, yes yes? Go raid my Craftsy shop, best before 28th December and make the bags in 2019.
p.s. please note all prices in my Craftsy shop are in USD.
p.s.s. to repeat, yes, all the patterns you buy from my Craftsy shop will still be available to you (in your pattern library) after my shop is removed.

Thursday, December 20, 2018

Crazy Patchwork Placemat

Look what the cat dragged in. A crazy patchwork for one side of a long and short handle bag from bygone days. I think most people who learnt to make bags would have made at least one such bag. Some people call it Japanese Knot Bag. The bag does not come with any bag closure. Instead the longer handle goes into the shorter handle to act as a closure. It is a unique bag. I made one for my dear mother and after using it she told me rather sternly never to make such a bag again. She found it rather irritating to unloop the handles in order to take things out of her bag. She returned the bag to me and I used it. Sure enough, the handles irritated the hell out of me. So I stopped making such bags. Maybe this explains why I have this unfinished crazy patchwork panel.

The crazy patchwork is quite well done. Well, except for the 2 long strips where the handles are. Otherwise, I would say this is a text book crazy patchwork.

I thought this would make an excellent placemat for my son so I cut the handles off. I told my son I was making a placemat for him and he said: don't make anything for me! Yes, I have that kind of family. They prefer factory made stuff. Nothing handmade please!

I had one issue with the placemat and that was whether to quilt the top piece to the batting and background. Since I already had the decorative embroidery stitches sewn on the patchwork, I didn't want to "spoil" the look. So in the end, I used an adhesive spray to temporarily hold the 3 pieces together. But honestly, it would have been better to sew quilting lines. The bias binding came from a leftover from Shirt No. 1.

Looking at the different pieces of fabric on the crazy patchwork makes me a little nostalgic. Yes, that word again. I'm remembering the projects I had made with each fabric. The center kangaroo(?) was a leftover from a Ikea fabric I used to make a blanket for my kids when they were in kindy. My daughter is still using it. The batik was from a cheap dress I bought at a flea market. It bled like crazy.  Took like 10 washing to get rid of the bleed. The camouflage fabric was from my very first sling bag... Where has the time gone?

p.s. Son has accepted the placemat, I think. I threw it at him and he didn't throw it back.

Thursday, December 13, 2018

It Started With A Rooster

One year, I started selling applique templates. I think it was 2014. Minutes or maybe an hour after putting the template on Etsy, it sold. I couldn't believe it. You know what else is unbelievable? I spent at least a month working on it. Like I fussed over this and that, it took forever to be satisfied. Anyway, because the rooster applique was my first applique in the shop, it has a special place in my heart. What you see above is one of the samples I made. I think I made a few and after making them, I put them away in a box. I've always wanted to do something with the rooster applique and since this month is my month of finishing UFO, I thought I'll give it a shot.

When I look at the rooster, I immediately feel nostalgic particularly about my childhood days. Back then I was living in a village in the 70's. (yes, I'm pretty old) We had a rooster. Or maybe more than one. I'm not sure. My mother reared a few hens, mainly as prayer food. (yes, we get to eat them too) Our rooster or roosters were not attuned to our Singapore time zone. Maybe it was a foreign rooster. Every morning, the dem rooster or roosters would crow at the top of his voice.

coo coo COO COO. coo coo COO COO. coo coo COO COO. coo coo COO COO.  Over and over again until eventually it grew tired. At 5am in the morning.

Back then our sunrise was 6am. It's not true that roosters crow in the morning. They crow whenever they like. Afternoon, evening, night. Especially at 5am in the morning. That's their favourite crowing time.

One time I asked my mother to cook the rooster. I was shocked when she said we do not eat roosters. We only eat hens. I asked her why and she said because rooster meat is tough. Man, that was news to me. I forgot to ask her why we kept the roosters around. Maybe she needed him as an alarm clock?

I don't know if you remember my love for anything Janet Bolton, my applique hero? I wanted to use the rooster applique in a Janet Bolton inspired art quilt. First, I had to hold a fabric audition.

At first I went with this but later I removed the blue houses fabric because it was too distracting.  I think Amy Butler won the bottom border.

I added a batting and sewed running stitches mimicking the curve of the sun. To me, the running stitches is the most important element of the art quilt. Without the puckers, it's too flat.

Perspective is totally disregarded.
These are gravity defying trees.

Flowers - in odd numbers, of course.

And the rooster did fly too close to the sun.

Every artist should sign her work. Mine was not very elegantly done because I used permanent ink and I had to sew over the marks. (shhhh)

Topstitch of the border using one of my favourite golden beige thread.


The final top stitch to secure the quilt to the backing. This is very Janet Bolton. I'm not sure exactly how she does it but I know she allows the stitches to show at the back. Haha. I used to be quite anal about hiding raw stitches but Janet Bolton has opened my eyes. Or shielded them?

I really love the final look. It has parts of me and parts of Janet Bolton. <swoon> It took me weeks to complete it. I'm utterly exhausted. What do you think? Is it too childish or just the right amount of child-like qualities?

6th UFO completed. <happy dance>

Friday, December 7, 2018

Crazy Patchwork Bag

A long time ago, I was crazy about crazy patchwork. I made a few crazy patchwork bags, some more successfully than others. But I don't have a talent for it. Crazy patchwork isn't simply putting random pieces of scrap fabric together. There has to be some cohesion and your colours need to go together. But when I do any crazy patchwork, that's exactly what I get each time - random pieces of scrap fabric put together. At some point I realised my lack of improvement and no matter how much I wanted it, I couldn't be good at it. So I kinda gave it up. The piece of patchwork you see above was my last attempt, abandoned and forever sitting in the store room. (the butterfly applique was added to cover up some gaps) I don't remember what I intended to do with it but at the back of my mind, I always wanted to finish it. At first, I thought of making it into a gigantic zip pouch but I don't really need another zip pouch. Then I had an idea - why not make another patchwork panel and make it into a bag? Well, when I had that idea, it seemed like a great idea...

So I put my idea into action. First I washed a bunch of scrap fabric. Next I ironed the scrap fabric. Then I sewed the fabric together. Which took forever. See the flower applique in the middle? It's to cover up the black fabric. Originally, I wanted to have some dark fabric because the other panel of patchwork had some dark fabric. But while I was sewing, I somehow went in the direction of blue and red. After hours of ironing and sewing, I took a photo of the completed piece and realised I had made the classic rookie mistake of patching with long straight lines so the patchwork did not achieve the degree of crazy as I had imagined. The original patchwork was in my opinion better patched.

I wanted to add machine embroidery stitches over the seams mainly because I have embroidery thread bought from Spotlight years ago which I never use and my sewing machine comes with a ton of fancy embroidery stitches. I mean, I have already spent so many hours on this UFO, what's another 2, 3, 4 hours? I chose the feather stitches because that's what I would sew if I were to do it by hand. Which I wasn't going to, not in a million years.

The embroidery was a huge mistake. Firstly, the sewing machine would get jammed after sewing a small section of the patchwork. It seems the top thread would get very tight, snagged somewhere I suppose causing the bobbin compartment to move out of position. I would have to fix it, put back the bobbin and re-thread. I had to sew at a very slow speed to make any progress. But no matter how I tried, it would happen over and over again. Sew a bit followed by a scary noise, like a car going over someone's head. I tried using a different colour thread, I mean I have FOURTEEN different colours to choose from. Nothing worked. Finally, I gave up. At the rate I was going, it would take me years to finish the embroidery. I almost cried when I realised I had ended up creating another UFO. Why did I need to embroider in the first place, right?

Did I tell you I don't give up easily? I don't have any other embroidery thread but I do have one precious cone of Aurifil. I used it for the top thread and OMG. It worked. No adjustments needed. Super smooth sewing. No scary bone crunching noise. And I could go at lightning speed. AURIFIL!!!!!!!!!!!!!!! I love you. If only it doesn't cost so much so buy you in Singapore. I ended up using the embroidery thread in the bobbin and it didn't cause any trouble so at least I could use them. How many years would it take to use up 14 cones of embroidery thread in the bobbin?

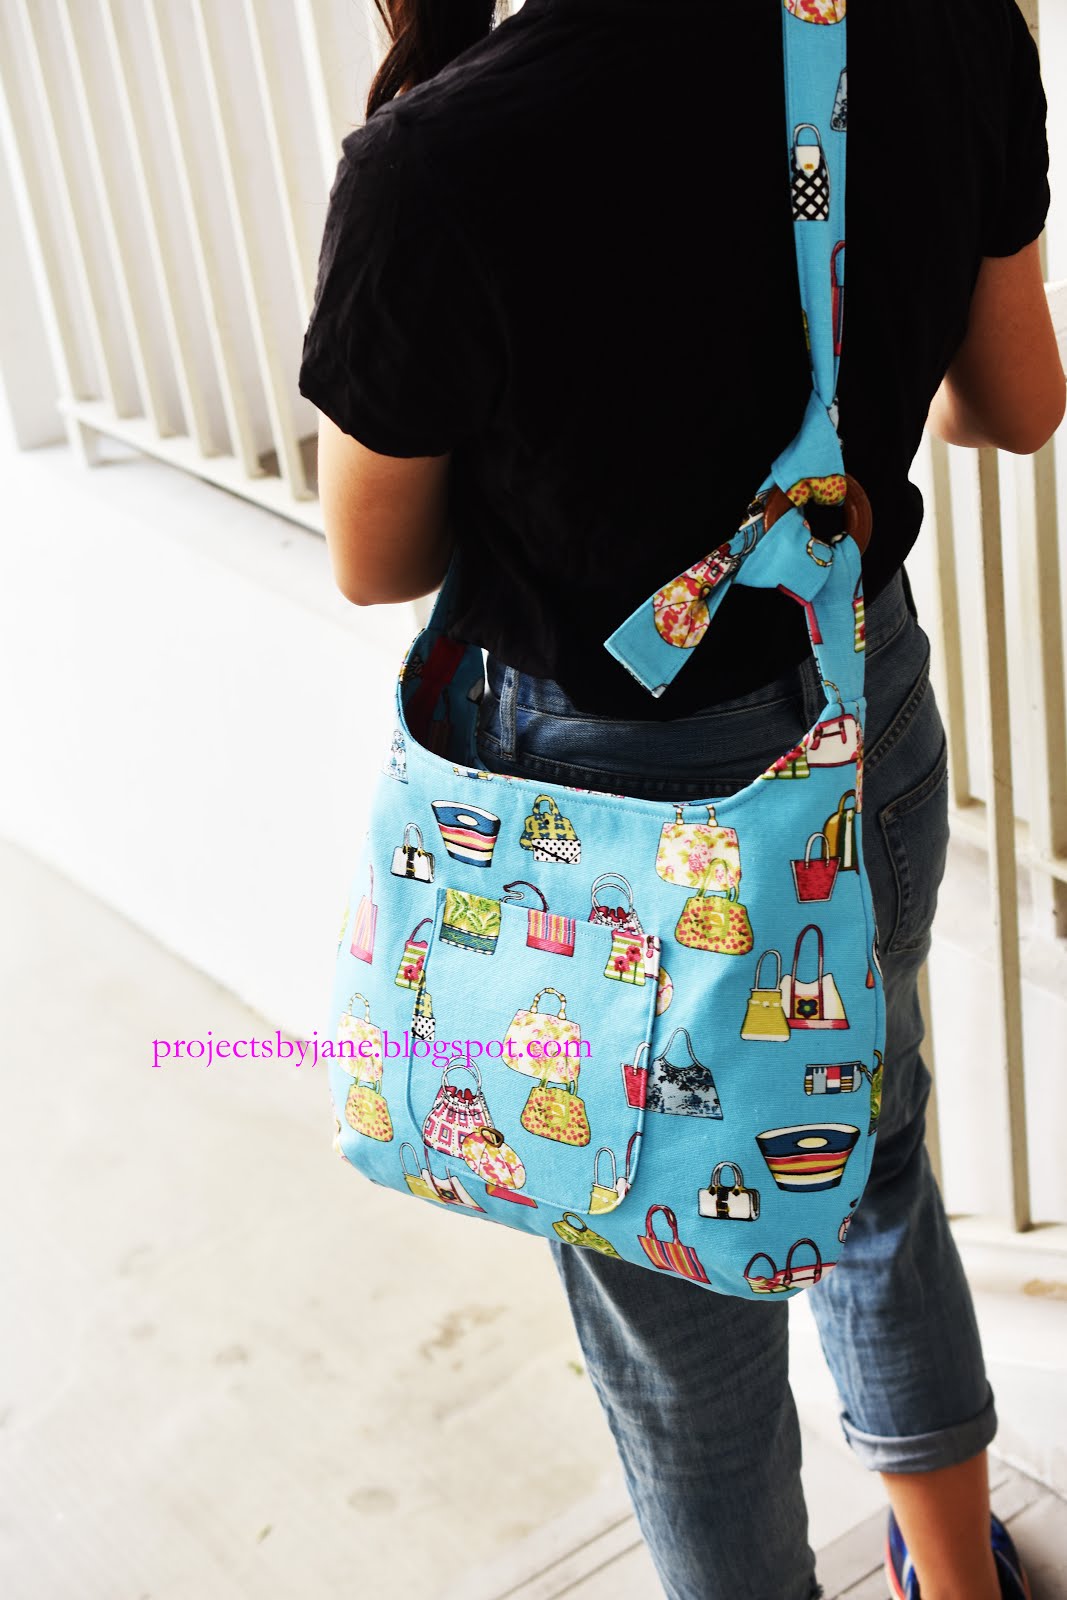
I wanted a simple bag to use when I go to the supermarket or gallivant around town. So no zipper or magnetic snaps. I also used an abandoned canvas strap. <win, win> Yes, I have all sorts of abandoned sewing stuff lying around.

For the lining, I used fabric my mother had given me plus I used an abandoned pocket. <another win> I do wonder where my mother gets her fabric? It's always tightly woven.

After the bag was finished, I had this CRAZY idea to topstitch BY HAND. This is why I shouldn't make any more crazy patchwork. I go a bit nuts. Did I mention the patchwork is sewn onto calico? That means I sewed through 6 layers of fabric and around the strap, I had to use a tool to pull the needle through. Never again. My fingers are still pretty sore.

It occurred to me that in order to finish one UFO, I ended up spending hours creating ANOTHER patchwork plus many hours on the embroidery. Seems kinda silly right? I think in this case, I can safely say I tried too hard. Waaaay too hard. And to top it off, ....

Yesterday I asked hubs to take a photo of me carrying the bag. Like I've done many times before. For some crazy reason, we got into a fight because he was confused by what I meant when I said take a photo of me "carrying the bag".  He tried to clarify, I got frustrated. I even drew a picture of a stick girl carrying a bag. Then both of us got angry. He started shouting. Somehow I was reminded of the Bintan incident when he screamed at me...

Despite all that, he took photos of me "carrying the bag".

5th UFO completed. I feel I went to war with this bag. When I look at it, I'm reminded of all the struggles I went through to get it done. I just want to burn it.

But I won't. Because I invested so much time in it, I'm using it until it disintegrates.

Thursday, December 6, 2018

One Hour Top


I rarely buy knit fabric because the price is ridiculous. A long, long time ago when I first started making bags I bought a piece of fabric with a lot of stretch. Before I learnt to make bags, I had already learnt to sew garments. So I understood grain and stretch yet I made a rookie mistake using stretch fabric for bags. Well, before long, the mistake became clear. My bag was stretched longer and longer and of course I never made the mistake again.

Last year, I sort of became interested in making garments again. I haven't thrown myself into it wholeheartedly because I already have a lot of clothes. But I do own a serger and I feel it's such a waste to let it sit on my sewing table. I looked around for an easy pattern to sew. I settled on Fancy Tiger's One Hour Top because it's a one hour commitment. I figured the one hour did not include printing and taping the pattern which I had done a few months ago. All I needed was knit fabric which I finally bought during a sale in October. I almost did not get the discount because the sales assistant was ignorant. When I asked why the fabric was not discounted despite it being tagged a sale item, she stupidly said: because it's from Europe. It sounded like a fake reason so I went to look for another sales assistant. Yep, I got a 20% discount. I find that when it comes to fabric buying in Singapore, I need to open my mouth and demand for a discount even when there are a hundred signs in the shop shouting 20% discount.

I opted for size S.

By the way, the pattern is free and you can get it here. No need to sign up for anything.

I serged all the seams. Since I bought my serger, I've never changed the needle. Well, after testing the fabric on the serger, I realised I needed to change the needle. The ones installed made huge tears in the fabric. I needed to switch to a fine needle. I went to youtube but couldn't find any needle installation for my machine. Finally I dug out the manual and the instructions were quite clear so I decided to try it. I was quite nervous because I'm not comfortable with my serger. So far it has always worked for me with very minimal changes. I've been very lucky.

Fortunately there was a needle holder which came with the machine. I bravely unscrewed the two needles and I put in size 11. Right away I gave the serger a test and it worked. I felt so good I  patted myself on the back. Change serger needles, checked.

Sewing the top (including cutting fabric) takes an hour or less. I only had some trouble with sewing the hem and collar. I was going to use twin needle to topstitch but the ones I have don't work on stretch fabric so I had to use the stretch stitch on my sewing machine.

I wished I had done something better for the collar instead of simply folding over and hemming it. Maybe a bias binding? The collar looks a bit weak and I fear it will collapse after a few wash.

Hubs took some pics of me in the completed outfit. I matched it with an old pair of Dorothy Perkins shorts. This is the only pair of black shorts I own apart from running shorts. I think it's time I make myself a proper pair of jean shorts.

As usual, I tried to clown around.
But hubs kept saying No, No, No.

I believe this photo captures what the One Hour Top is. A blouse that looks good only when your arms are stretched out. Of course I can't walk around like a scarecrow.

I particularly don't like all that amount of ease around the armpit. Me thinks this design is more suitable for a bustier woman. I'm flat as a runway so...

My solution was to wear the top with the sleeves scrunched up.

If I were to make this top again although I probably won't, I would go down to size XS, make it longer with the bottom of blouse a lot tighter and the end of the sleeve more fitted.

What do you think? Pass or fail?

4th UFO completed. A very small yay.

Wednesday, December 5, 2018

Perfect Miter


I made this stitch sampler a long, long time ago when I was a different person, with different aesthetics. When I was done with the embroidery, I had no idea what to do with it. So it kept going into the store room and from time to time, I'll discover it and I'll say I must make something with it. But then I never do. The thing is I'm quite uncomfortable with unfinished projects especially if I've spent a huge amount of time on it already. If it's unfinished, I keep feeling that I need to finish it. Even if it takes years. Well, this time I'm happy to report that I finally finished it.

My idea is nothing fantastic. I thought I'll just make a border around the sampler so it looks like a photo frame. It came out more like a quilt. Except I didn't sew any quilting lines because well, it's a stitch sampler! But I added batting and a backing. I did a self-binding fold over thingy. Looking at the sampler, I don't have much empty space around the stitches. So I decided my finished fold will only be 1/2"  wide all around. To get that result I cut my backing larger all round by 1".

I make 2 folds for every side. The first fold is 1". Open up the fold again. Make a second fold 1/2" wide to hide the raw edges of the backing.

Position as above - raw edge of folds meets the raw edge of sampler. From each corner of backing fabric, mark 1" away from the corner. Why 1"? It's actually 2 X finished fold. So whatever your border width you use, just multiply the FINISHED FOLD WIDTH by 2. Mine is 2 X 1/2" = 1".

Draw a line to join the 2 points.

Right sides together, match the points.

Pinning on the line helps with the alignment.

Sew on line. Very important to backstitch. Trim bulk.

Turn to right side. Use a point turner to get your corners sharp. Repeat for all corners.

Pin border to sampler. Use walking foot to sew round the border close to the edge to secure all 3 layers together.

This is the back.

In front - perfect miter.

How many of these stitches do you recognise or use?

3rd UFO completed. YAY! This one, I'm patting myself on the back several times. Woo hoo!!!
Related Posts with Thumbnails

My Bag Pattern Shop

https://www.etsy.com/shop/projectsbyjane

My Applique Patterns

https://www.etsy.com/shop/projectsbyjane?section_id=15580078&ref=shopsection_leftnav_2

My Embroidery Patterns

https://www.etsy.com/shop/projectsbyjane?section_id=15580078&ref=shopsection_leftnav_2